Showing posts with label tutorial. Show all posts

box3

This is a box I made a few weeks ago, I think it was in the beginning of the Summer or something like that. Mom was visiting and needed a little hostess gift for a friend who invited her on dinner..

box4

So I made this little box, which I’ve created a few times, and even done a tutorial on for the Norwegian challenge blog That’s Just So Cute back in July. Figured I’d share the tutorial here too, in English..hm? (the Norwegian version can be found here). Scroll down…

box5

See…it holds such candies so well…I think it’s a nice treat and it’s pretty quick whipping up aswell – I only had half an hour creating and photographing this one before mom was off for that dinner of hers...all materials: Prima Marketing for the box above, and lots of Crate Paper for the box in the tutorial.


Right, the tutorial. First you have to find a small, open box, or create your own (see tutorial on how to fold the box itself here).


box_tutorial1

Find a thicker cardstock/cardboard for the top/bottom. I usually ask the LSS whenever I’m dropping by if they have any pieces they don’t mind giving me – they normally get such when they receive their papers. Place your box upon, and cut out two squares larger than your box.


box_tutorial2

Like this – one for the bottom and one for the top!


box_tutorial3

Dress up the bottom/tops..

box_tutorial4

Now, for the flap at top, cut out a strip of cardstock slightly wider than your box, and adhere it to the bottom between the bottom/box, fold/score, adhere to the back of the box..leave the top for now, we’ll decorate it first before attaching it to the flap..

box_tutorial5

Right! Decorate the top!

box_tutorial6

Then adhere it to the flap..feel free to add like, ribbon or something like that so it’ll be easier opening the box..(I know, I’m so wonderful at explaining…but the truth is, I usually just wing these kinda things so maybe it’s why I find it hard to put it into words, hmm! Nevertheless, I hope you got an idea of how to do these boxes..it’s just to get started then it’s pretty self-evident what to do sorta :) )


box

When I got a request from the Norwegian challengeblog That’s Just So Cute about guestdesigning and creating a miniclass for them, I couldn’t say no. I’m just as happy and honored every time somebody wants me to be their guest :) Here´s the post - check out what the ladies did with my challenge, and by all means, feel free to join! :)

box_cu

As it happened the request coincidenced with me having to create a goodbyecard for the kindergarten for the kids quitting this summer. So I figured I might just as well build upon a former tutorial w/the boxes and expand it to become a box w/lid. Pretty much all the materials here are from Crate Paper but the bauble (Prima) and letters (American Crafts).box_open

You can find my post w/the tutorial and the challenge at TJSC here. Feel free to join the challenge (which’s simply to create a project – layout, card, altered – anything – with at least three different materials. Paper doesn’t count).

giveaway

Here’s what the winner of the challenge can expect, by the way.

Hope you’ll join :)


weddingbox1Welcome to the Crate Paper Wedding Special!

You *must* have a look at their wedding pages, what these gals have done w/this theme is simply amazing…I envy their abilities to shoot their projects in like, perfect surroundings and all, and really go for the whole scene & feel and stuff. Nevertheless..

I’m gonna share how I folded these small yet very sturdy boxes here – they can be used for pretty much everything…create two (with one slightly smaller than the other), and you’ll have a box w/a lid…

To create the box, you need a square. 7x7” yields a 2,6” box, 8x8” yields a 2,8” box.

tutorial1

Fold the square both ways – first one side, then reopen before folding the other side. Use a bonefolder to get crisp folds.

tutorial2

Now you need to fold it diagonally. First one side, then reopen before folding it the other way.

tutorial3

Now, open the paper. Fold all the corners into the middle/center, like pictured. (Do the last one not done in the image too)

tutorial4

Letting the folds stay, fold the edge towards the middle. Do the same with the opposide edge. Burnish with the bonefolder.

tutorial5

Now, open the edges you just folded into the middle all the way out. Let the ends stay flat.

tutorial6

Fold the two other edges towards the middle.

tutorial7

tutorial8

Now, open the two last folds upwards and grab the corners as shown in the picture..

tutorial9

Wrap the flaps over like in the image, tuck and create a little box..

tutorial10

Congratulations, you now have a little box! Feel free to add a square of doublesided tape/adhesive to the bottom of the flaps so they will stay put.

weddingbox2

For every one of these boxes I created them an individual tag reflecting the style of the box’s patterned paper, using lots of scraps (lots of scraps is good! Always makes me happy when I actually use even the tiniest bit!). Lovelove the Hambly Screenprints-transparencies used on two of the tags…sigh…the sheets are soon used up (the cream ones)…nrgh! They’ve lasted me a long time though, and I’ll definitely buy them when I see them again!

weddingbox5

I’ve used bits and pieces of both newer and older Crate-collections, and placed the boxes upon sheets of tulle, wrapped them up and tied them w/bakers twine. Some flowers from Prima snuck in on this one as well.

weddingbox6

Thanks for looking, and don’t miss the rest of the wedding fun over at Crate Paper – lasting all week long!

wedding week 2

There’s even challenges going on, just check out this post (and I believe it looks like more are coming).


Been a while since I re-posted some of the older tutorials (to new readers: I’m trying to gather my various tutorials placed randomly around the web – so I can have them all gathered on my blog). Here’s the first tutorial I did for Crate Paper back when I started designing for them (you can also find this one on their blog here).

The below is taken from the tutorial-post:


Ania here with my very first tutorial for Crate Paper - Yay! First, let me come clean and admit something. This project - a mini album - came together because I've recently been a bad girl. I promised my mom (as usual) that I'd send grandma a postcard (as usual) during my vacation, but some how, I kept putting it off 'til it was too late. Ugh. Bad & Embarrassing, I know. So, I figured I'd make up for it by making her a mini album instead..but, don't think I'm good because I made her a mini. I'm actually terrible at making amends...

There - I said it! Let's continue, shall we?!

Here's what you'll need:

  • At least two sheets of Patterned Paper (Restoration Collection)
  • Embellishments (Restoration & Pink Plum Collections)
  • Scoring Tool/Bone Folder
  • Ruler
  • Mod Podge/Sealer/Multi-Medium Matte (Claudine Hellmuth)
  • Adhesive (Both Liquid & Double-sided)
  • Sewing Machine
  • Bazzill Cardstock
  • Fiskars Edge Puncher
  • Staples
  • Adorn It Letters/Alphas
  • Prima Flower

ania_aug_tutorial2

Cut a strip of the patterned paper you'd like as your cover. Based on my photos (which was four images printed on a 4" x 6" sheet) I determined my mini would be 3 1/4" tall and 4.5" long (the cover is slightly longer - the inner pages are 4.5" though). Using a center finder ruler, measure the area in the middle to create a series of accordion folds for the binding of the album (an extra inch or two of paper length required for this part of the album - think about this when trimming paper for your own album.)

Note: In hindsight, I should of probably used a separate piece of cardstock or double patterned paper for this part (accordion section), because in the end, there was a noticeable amount of white between the pages. I loved the edges of the die-cut paper though, so I had to use it!

ania_aug_tutorial3

Measure so that you can create nine creases between between the front and back of your album (yielding four "inner-tops" = 8 pages (front & back)). This part is when I wish I had some kind of scoring tool! :P If you're without one, use a metal ruler or bone folder instead.


ania_aug_tutorial4

Take a sheet of patterned paper, cut one side to 9", then turn and cut it into "four" 3" strips. The inner pages should be slightly smaller in height.  Fold them in two (yielding 3" x 4.5" pages for your mini).


ania_aug_tutorial5

Optional: Paint the cover with mod podge/sealer to make it stronger.

ania_aug_tutorial6

While the cover is drying, create a cover-embellishment for your album. I opted to create a frame using pieces from the Restoration collection: Chipboard, Paper, Rub-Ons & Stickers. Test your embellishments loosely before adhering them down.

ania_aug_tutorial7

Here is my finished cover piece: Layered Paper, Chipboard Frame & Flower, No. 19 Rub-On, Label Sticker, Rhinestones & Button w/Tie.

ania_aug_tutorial8

Decorate your inner pages. I loved this pattern paper, Slipcover, so much that I didn't want to cover it up. Hence this simple set-up with bare patterned paper, photos and an occasional brad or chipboard piece.

Note: you can also trim the pages individually, though I wanted to preserve the folds.

ania_aug_tutorial9

After all the pages are done, adhere the pages together. Apply liquid glue to each crease and insert page into crease - press the crease around the page to ensure that page adheres appropriately. Make sure the page is deep into the crease and all the way in. Rinse & repeat with the other pages.

ania_aug_tutorial10

When done, press the mini together (watch out for adhesive between the pages themselves - wipe any spilled glue away)

ania_aug_tutorial11

I decided to make a small spine cover to place over the creases of my album. Pre-measure and trim to size a small section of pattern paper to fit over the spine and punch edges using a decorative border punch (fiskars). Don't forget to apply mod podge/sealer to this one as well!

ania_aug_tutorial12

Apply adhesive the sides (not middle section!) of inner spine cover. Add to album and leave in place!


ania_aug_tutorial13

ll righty - all that remains is to adhere the cover-embellishment we made earlier on!

And here's the finished mini in all it's glory..let's hope grandma enjoy this so much that she'll forget I didn't send her a postcard this Summer *cough* :)

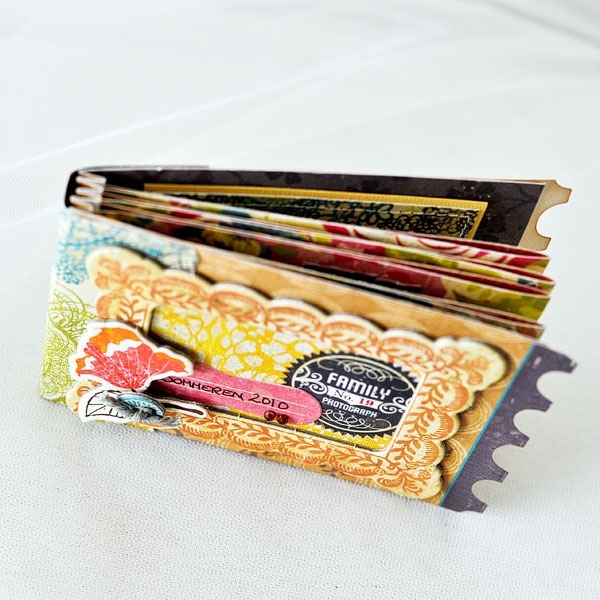
 

minimini2mini4mini7mini10


There you have it :)


By the way, after much hemming and thinking, I’ve decided to create a disclosure-page – found on the top of this blog. Tbh, to me it’s pretty evident that when you’re part of a design team, part of your “job” is to create samples and stuff with their products and then sharing what you have created – plus the occasional promote-post re. things they do and stuff. And even after your term with them ends, you usually still have lots of products from the time w/the manufacturer, and you still find the time creating stuff w/them and stuff – even if you’re no longer “obligated” to.


I join design-teams because I love the products they produce (more or less – you can’t really love *everything* although some manufs really come close ;) – and even products I initially go “uhm, no, that’s so not me” about – have usually been the ones I’ve used the most/loved more and more over time, haha), and the love of using said products doesn’t end within a date.


However, there’s a Norwegian discussion about bloggers and promoting, and although I personally never really compared myself to the bloggers the discussion’s been about (plus, my design teams haven’t been “secret” either), I figured it’d be better to come clean w/an own disclosure-page explaining how things are for those not really aware how scrapbooking&designteams work just in case. Better safe than sorry? :p


I dunno..have you seen disclosures on scrapbook-blogs? (apart from the sites like Craft Critique, who receive samples to review them)


I’m so glad you guys seem to enjoy my old tutorials :) And it feels good having them all gathered in one spot (for me). So, for todays tutorial I found this old one I did for Hambly Screenprints back in 2009. Here is the original post. I hope you’ll enjoy it :)


Whenever I buy clothes I always save the tags for future projects without really having any particular plans for them. Especially if the tags are in chipboard and cute.

For todays tutorial I figured it was about time to clean out some of the tags & the Hambly scrap-box at the same time.
Here's what you need:
Tags in various sizes
Leftover-scraps
Passport-photos
Small bits & pieces of chipboard, buttons, stickers etc. Today's about cleaning up and using some of the stuff you got lying around =)
Adhesive of choice. I used double-sided tape.
Scissors & exacto knife
Crop-a-Dile
Gesso
Bookbinder-ring

Assemble a number of tags. Don't worry about the different sizes or thickness.


Apply adhesive on the tags (make sure you cover up the "ugly" side) & dress them up with papers. Trim to fit.

Repeat with the rest of the tags.

Apply gesso on the backside of the tags (the "pretty" side) if you want to use them for journaling. Let dry. Punch holes and put on a ring.

Place photo(s) and 2-3 embellishments together. Adhere.

Gather the tags together and bind it with a bookbinder-ring or ribbon. Tadah :) You now got yourself a cute and sturdy little tag-album you can put in your bag :)


Here’s more images of this mini:


I feel the itch to make a mini or two again soon! I did one a few weeks ago, but am hoping to get it picked up, so can’t share it yet… am in Oslo atm attending DOK:11 (a Norwegian photofestival for pressphotographers) & meeting family and friends.. I know I’ll come back with lots of photos to scrap, but uhm, I still haven’t turned last years DOK:10 into a mini as I originally planned…..soooo eeks..need to do that first before I handle DOK:11, no? Hmm!